 Enable Screen Recording in iOS 11
Have you been looking for the easy way to explain certain steps of tutorial to a friend or someone before?, you will agree with me that teaching a new trick or offering a tutorial to a newbie is one of the most frustrating things to do because no matter how hard you try some people will still say ” I don’t understand”. do you think you are one of the worst teachers “No” that how many people are slow learners? Well, this problem has to be fixed because it is a general problem to many people.
Apple see the need to provide solution to help make tutorial easy and simple by introducing an inbuilt screen record in iOS 11, with iOS 11 you’ll be able to record your screen natively and share it with your friends, so as to make understanding easy, instead of adding confusion by sending them a barrage of screenshots.
WoW ! this is a great feature, you will no need to record iPhone or iPad’s screen using QuickTime on your Mac. With iOS 11, you’ll be able to record screen-capture video directly on the device. Without further grammar, let’s take a look at how to screen record in iOS 11:
How to enable screen recording in iOS 11
This tutorial is too easy and not too tedious because I tried this on an iPhone 7 Plus and an iPhone 6s running the latest iOS 11 beta 1 for developers, so this should work for you too.
The screen recording feature is built right into the iOS 11’s Control Center. By default, this toggle doesn’t show up, and therefore, you have to add it to the Control Center before you can start using this feature.
You’ll start and stop your recordings from Control Center. First, we’ll enable the button, then explain what happens when you press it.
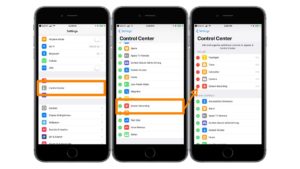
- Launch the Settings app in iOS 11.
- Tap Control Center.
- Tap the plus sign next to Screen Recording to add it to your Include list if it’s not there already.
Record Screen in iOS 11
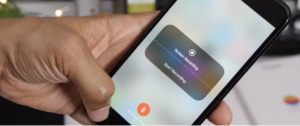
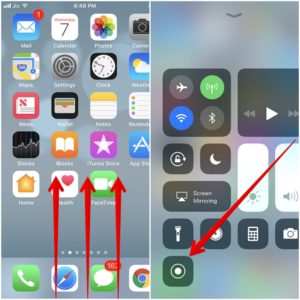
Once you have enabled Screen Recording in the Control Center as instructed above, you can swipe up from the bottom of your iPhone to invoke the Control Center. You should notice that there’s a toggle for screen recording, as shown in the screenshot below. Tap on it once, in order to start recording whatever you want.
While it’s recording, the screen record icon will be red and a blue bar will be displayed at the top of the screen which shows the elapsed time. If you want to stop recording, you can either tap this blue bar and press “Stop” or tap on the toggle again.
iPhone 6s/6s Plus or iPhone 7/7 Plus, allow you to make use of the 3D Touch feature that’s available for the screen recording toggle. You can force touch on the toggle, in order to enable or disable your device’s microphone audio. So, if you want to record something with your voice, you can certainly do that.
You can access the recorded video file in Photos App. In this app, you can edit and even crop out the unnecessary portions of the recorded video. This is pretty important, as every single recording starts with your Control Center.
Screen recording tips
- Screen recording on iOS 11 records everything you do, it’ll also capture those moments when you close Control Center or stop a recording. To make your videos look a professional, be sure to trim the first and last few seconds of the video in the Photos app.
- Another potential annoyance in screen recording will be push notifications doing the recording. Turn on Do Not Disturb, or set your device into AirPlane Mode to put those on pause and stop visual interruptions in your recording.
- When you start a screen recording on your iOS device, it’ll also capture your current status bar. That means low battery levels, and low-signal strength as well. If you want to go for a clean look of 100% battery and full signal, your best option is to plug it into your Mac.
The instructions listed here is to follow, as if you were going to record on your Mac, but start the recording from your iOS device instead. Using this approach will make iOS show your battery as 100%, full carrier signal, etc. If you’re going through this much effort though, it might just be easier to record and edit after on your Mac.
Why you would want to screen record on iOS
One obvious benefit of screen recording on iOS is that you’ll be able to share your screen record with others. Making tutorial and explanation easy to friends and family members. The next time you are Trying to teach someone how to navigate through a list of menu items? Record a video of you, with microphone audio recording enabled, and walk them through it step by step.
Other benefits of screen recording on iOS 11 also means third-party apps will have to rethink privacy within their ephemeral content services. While not the company’s main directive, apps like Instagram and Snapchat might want to look into educating users on the changes that built-in screen recording will bring.
So, are you ready to try out screen recording for yourself? please let us know how the process went by shooting your opinions in the comments section down below, and lastly, don’t forget to show some love by sharing this content with love ones
Get Stuffs Like this, to Ur' Inbox:
Here we have provided various apps by which singles find their dates online by filtering out the preferences and make the love happen.
Nice post. Can you tell me about the theme used your site, I like your website thank you.
thanks for stopping by
Hello. remarkable job. I did not expect this. This is a splendid story. Thanks!