ADB/Fastboot Drivers: Windows PC, MAC & LINUX
So What’s ADB?
ADB, which means Android Debug Bridge which can be accessed when an android device is booted into the Recovery mode. With ADB, you can do root stuffs, and other system operation that requires super access to the device. It works by sending terminal Linux type commands to the android device via system application on Windows PC or MAC. Usually requires connection between your desktop and android device.
Before, we go further, let’s look at what’s Fastboot?
Fastbooting
With fastboot, you can flash and re-flash system partitioning inside of your android device by entering into fastboot mode or bootloader. you can install system apps, like Google apps via fastbooting and other operating system.
To perform a fastboot, your device bootloader has to be unlocked first. There are one or two reasons why need arises for a fastboot, maybe to update your device manually to the latest software update, to flash your device with a custom ROM, to install stock ROM unto your device when device experiences soft brick issues, to install a stable OS version to your device etc.
Installing ADB
Below is a step by step guide of how to quickly and easily setup ADB and Fastboot drivers for your Windows PC or MAC computer. Installing ADB is a two way process, first you need to setup your Android Phone and also your computer.
Setting Up ADB for Android Phone:
- First go to Settings on your Android smartphone
- Next, go to About phone option
- Tap Build Number option 7 times inorder to enter Developer Mode
- If your device is already Developer Mode enabled, you can skip the step above
- Enter the Developer Menu by going back to Settings Page
- Locate USB Debugging mode and enable the option
Voila! You’re done with setting up your Android smartphone for the Android USB Bridge Debug. Next, is to go inside of your Windows PC or MAC computer to continue setting up the computer aspect.
ADB for Windows PC
I assume you have already enabled the Android debug option for your Android device, if you haven’t done that, go to the steps listed above. To continue with the setup process on your Windows PC, first download the ADB file from the Archive in the LINK. And use this steps listed below to set it up on your computer.
Installing ADB for Windows PC
First Method:
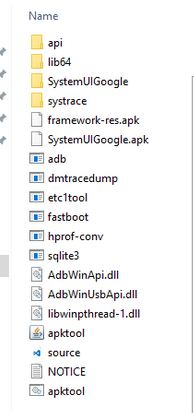
- Locate the downloaded ADB archive file
- Click to extract the Zip file to location in your computer like the main drive, C:\adb
- Go to the location you extracted the contents to
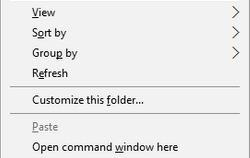
- Open a command terminal in the same directory by Holding Shift and Right-Clicking around the folder
- Click Open Command Window here option(If you are using Windows 10, you click on Power Shell instead of Command Prompt)
- Connect your Android device(Smartphone or Tablet) to computer via USB Cable
- Change USB option to File Transfer MTP (usually Default)
- Go to the Command Prompt/Terminal and launch ADB daemon by typing and hitting enter: adb devices
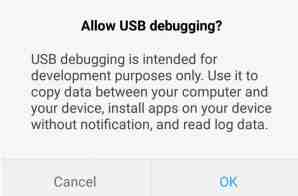
- Your phone pop up with a notification either to Allow or Deny USB Debugging Access
- Tap Allow to grant Access
- Type adb devices again, this will show your device info like serial number
Voila!, ADB has now been set for your computer. You can now use any ADB Command for any installation. Next, we would look at another alternative of setting up ADB for Windows PC.
Second Method:
If the first method looks quite difficult for you, then you can try out the second method, which is pretty straight to the point. This method of installing ADB to your Windows PC requires you install an application, crafted from the XDA team member, Snoop05. With this, you can easily install both ADB and Fastboot drivers straight to your computer in few clicks.
Below is a step by step process of how to quickly setup ADB to your Windows Computer using the application created by XDA SnoopO5 member.
ADB and Fastboot Setup in 15 Seconds
- Click on the link to Download 15 Seconds ADB Installer 1.4.3
- Alternatively, if you experience any bug or problems with the first link use, the second link here: ADB Installer File V.13
- After download, double click on adb-setup-1.4.3.exe file to begin the installation process
- When Command Prompt terminal shows with Blue background type Y and hit enter. In order to accept YES for all the prompts on the screen
When done!, you have now fully setup ADB and Fastboot Drivers for your device.
ADB for MAC OS
Installing ADB, Android Debug Bridge for MAC computer is also very easy. First, you have to enable Adb debug on your Android phone given in the procedures at the top of the post. Next, is to setup your MAC OS to use ADB terminal and commands, just as in the Windows PC procedure shown above.
Installing ADB for MAC
- Click on the LInk to Download ADB Archive Zip file for MAC OS
- Extract .Zip Archive file to any location you can easily access within you MAC computer
- Open Terminal app in MAC
- Enter the following command into terminal taking note of your location extracted the aDB files into: cd /path/to/extracted/folder . In my own case, it’s /Users/FK/Desktop/adb-tools/
- Connect your Android phone to your MAC computer via USB cable
- Choose the File Transfer MTP mode
- Execute and launch ADB daemon once the terminal is in the same folder as your ADB tools. Type this command into your terminal: adb devices
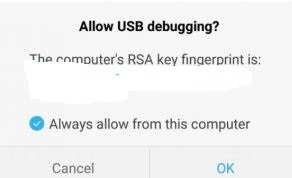
- On your smartphone screen a notification pops up to Allow USB Debugging . Allow the connection
- Enter adb devices command again in terminal. You will then see your device info, like serial number in terminal app
Now ADB has been fully setup for MAC OS, you can run any adb command via terminal to execute into your device.
ADB for LINUX
Installing ADB for your LINUX computer is similar to installing ADB on MAC and Windows PC but with a little tweak. Below is the procedures to quickly setup ADB for your LINUX operating system computer.
Installing ADB for LINUX
- Click to Download ADB Archive ZIP file for LINUX computer
- Extract the ZIP archive file to a location you can easily identify
- Open LINUX TERMINAL
- Type the following command inside the terminal: /path/to/extracted/folder/
- Typing the above command will set the directory the terminal should look at, where you had already extracted the archive files. In my case, the directory of extraction is: /Users/FK/Desktop/adb-tools/
- Connect your smartphone to your LINUX OS computer via USB cable
- Change connection mode on your smartphone to File Transfer (MTP)
- Once you have the correct directory path of the extracted adb files using the terminal command shown above, you can then launch the adb daemon by typing: adb devices
- In you phone screen, you get a notification in return to Allow Debugging. Allow Debugging
- Enter adb devices again and hit enter in the LINUX terminal. This will show you your smartphone serial number, indicating that everything is pretty set. Voila!, adb as been successful installed for LINUX. You can now run all sorts of adb commands to your android device via the LINUX terminal.
Get Stuffs Like this, to Ur' Inbox: